 Forum : Veicoli militariSoggetto : U.S. Light Tank M5A1, Tamiya, 1:35, FINITO |
 Jakubsdk :
|
11/1/2020 15:59 |
 Hi, Hi,
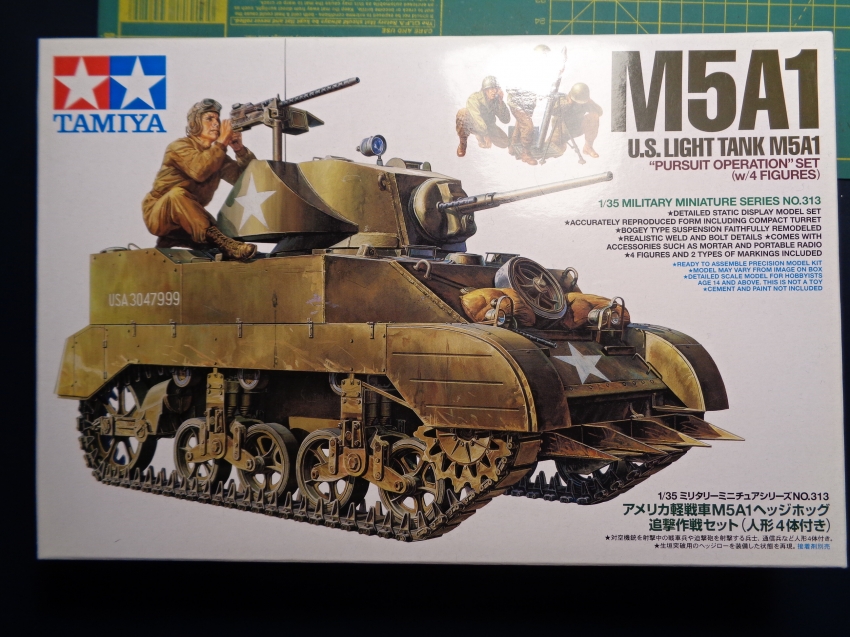
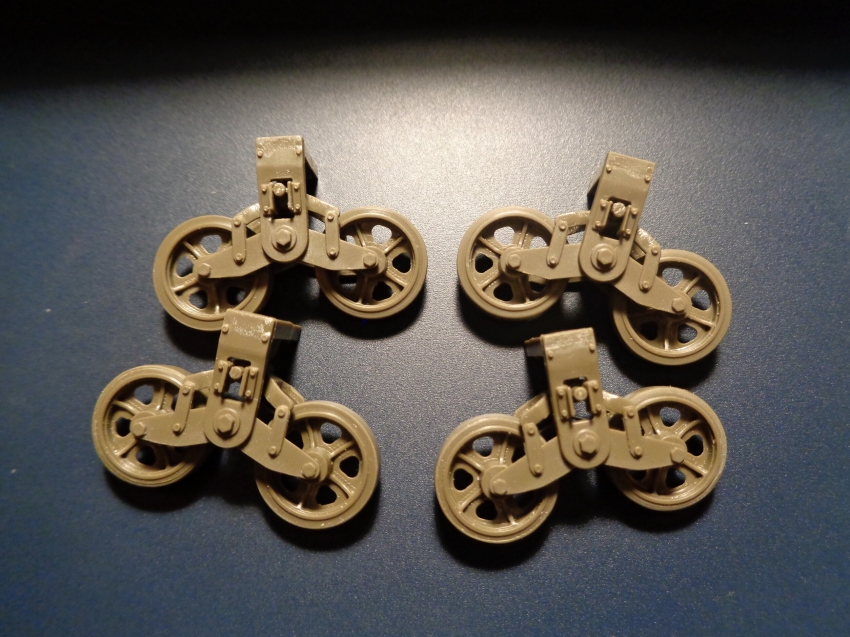
not only to show paper, I'd like to show you the current model I have on my desk. I got this American light tank for Christmas from my wife. So far I am working on the wheels and soon there will be another report from the construction.
So far.
Ciao,
non solo per mostrare la carta, vorrei mostrarti il modello attuale che ho sulla mia scrivania. Ho ricevuto questo carro armato leggero americano per Natale da mia moglie. Finora sto lavorando sulle ruote e presto ci sarà un altro rapporto sulla costruzione.
Finora.
| |
|
enrico63 : |
11/1/2020 16:02 |
Intanto che aspetto di vedere il tuo lavoro ti dico che sei molto fortunato ad avere una moglie che ti regala scatole di montaggio!!
| |
|
maucrifra : |
11/1/2020 18:08 |
|
Controlla bene la documentazione perché la versione della tamiya e tutta sbagliata è un miscuglio di versioni perché avendo la torretta con L orecchio dovrebbe essere un M5A1 ma per essere così manca il cassone dietro e alcuni particolari, senza il cassone dietro è un M5 Late però non dovrebbe avere orecchio dove sta posizionata la calibro 30, poi misurato è sottodimensionato le decal mi pare che anche quelle a parte una versione di fantasia | |
|
Jakubsdk : |
11/1/2020 19:56 |
Thank you for the information, I look at the web and explore it. In tank technology I do not know much. If you have any documents, I will be glad for them.
Grazie per l'informazione, guardo il web e lo esploro. Nella tecnologia del serbatoio non ne so molto. Se hai qualche documento, sarò contento per loro. | |
|
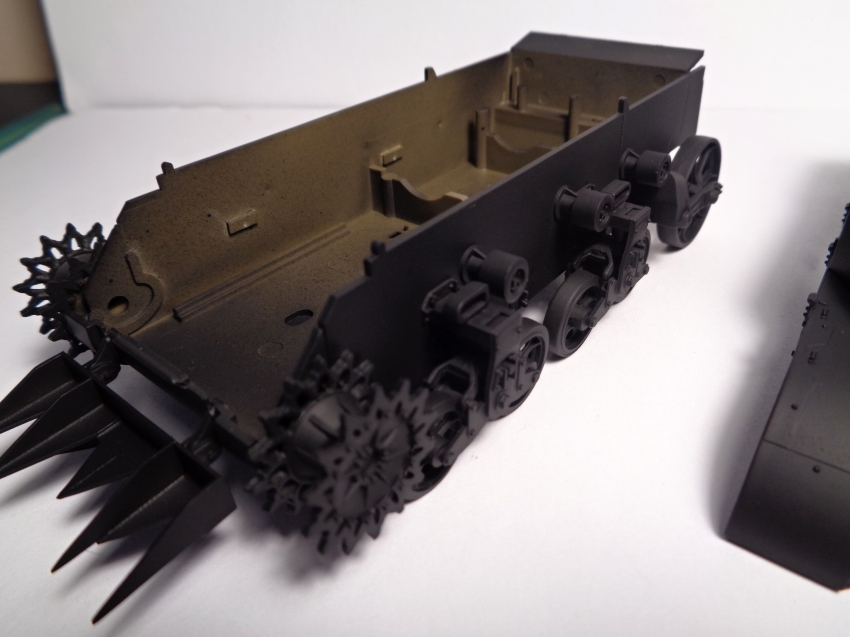
Jakubsdk : |
12/1/2020 12:01 |
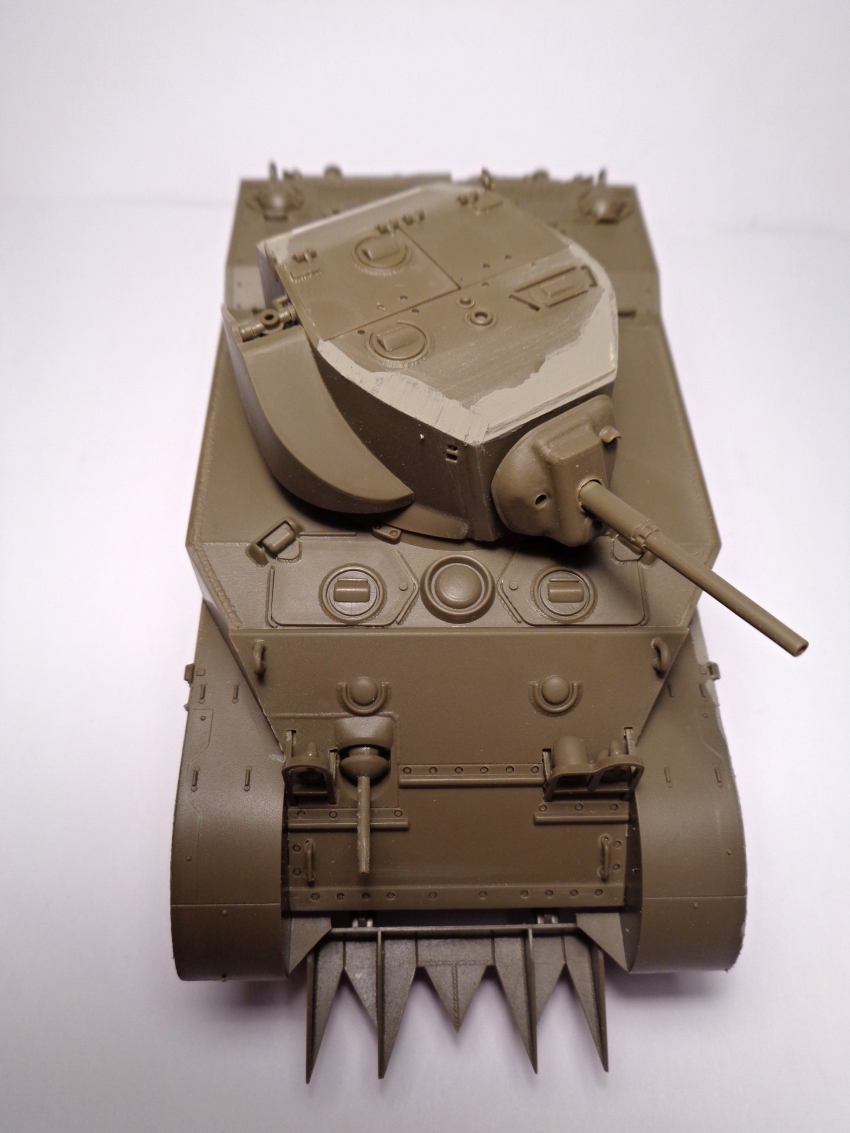
Good Sunday, everyone.
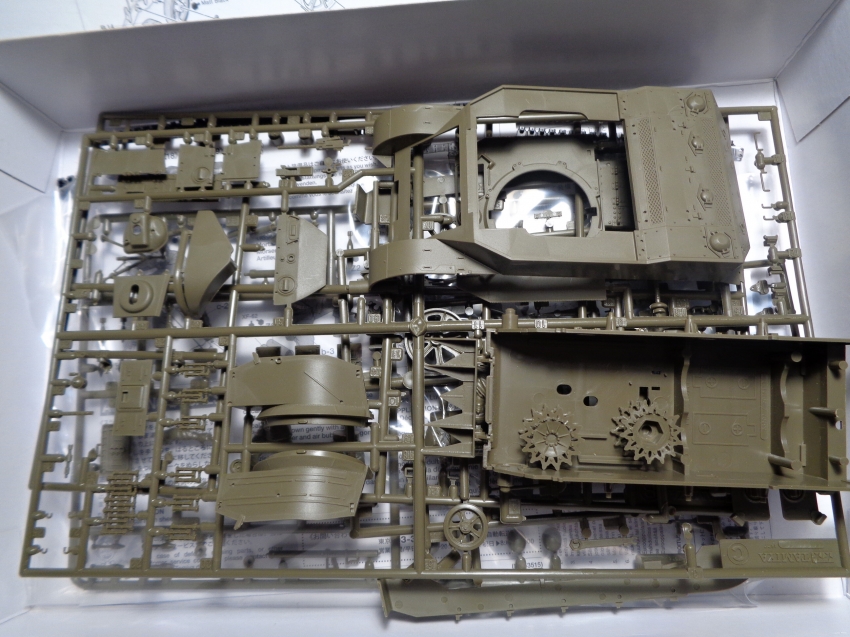
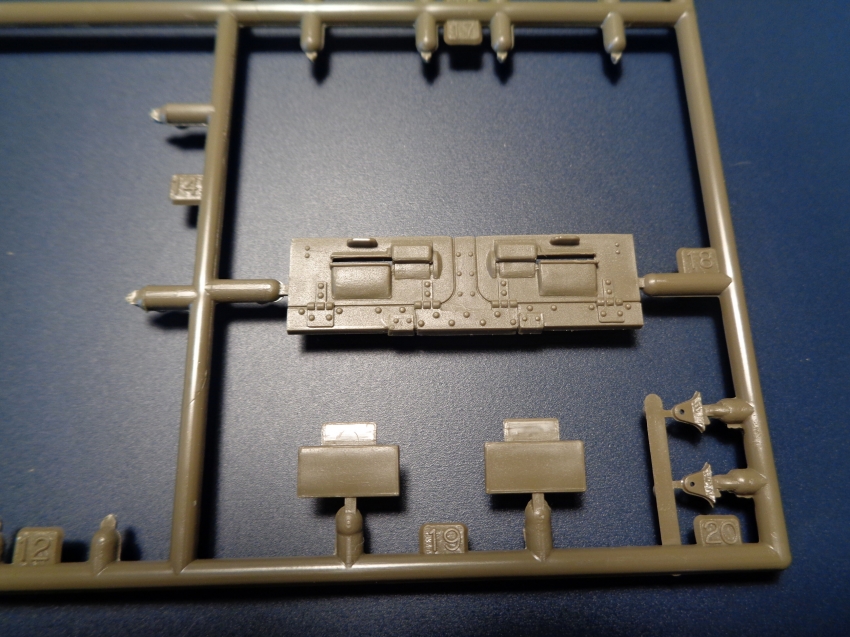
in the evening I advanced a little and assembled part of the tank. On that occasion I discovered parts that do not belong in the kit. But it does not matter, I use them elsewhere. So far compiled as follows. Soon another report.
Buona domenica a tutti.
la sera ho avanzato un po 'e assemblato parte del serbatoio. In quell'occasione ho scoperto parti che non appartengono al kit. Ma non importa, li uso altrove. Finora compilato come segue. Presto un altro rapporto.
| |
|
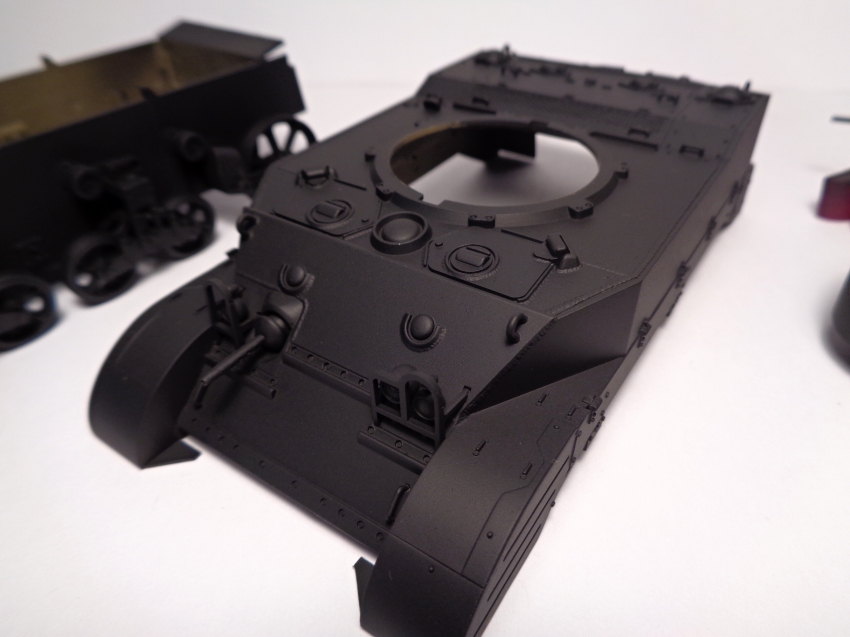
Jakubsdk : |
16/1/2020 00:58 |
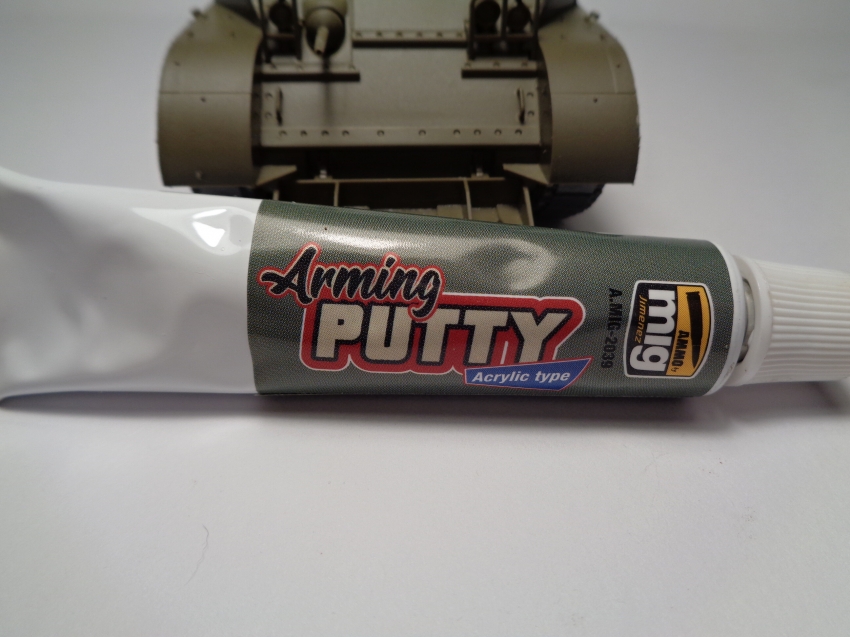
Good evening,
today I added some details. The next step was putty, I used acrylic from AMMO, it is great to work with. Next steps soon. 
Buona sera
oggi ho aggiunto alcuni dettagli. Il passo successivo è stato lo stucco, ho usato l'acrilico di AMMO, è fantastico su cui lavorare. I prossimi passi presto.
| |
|
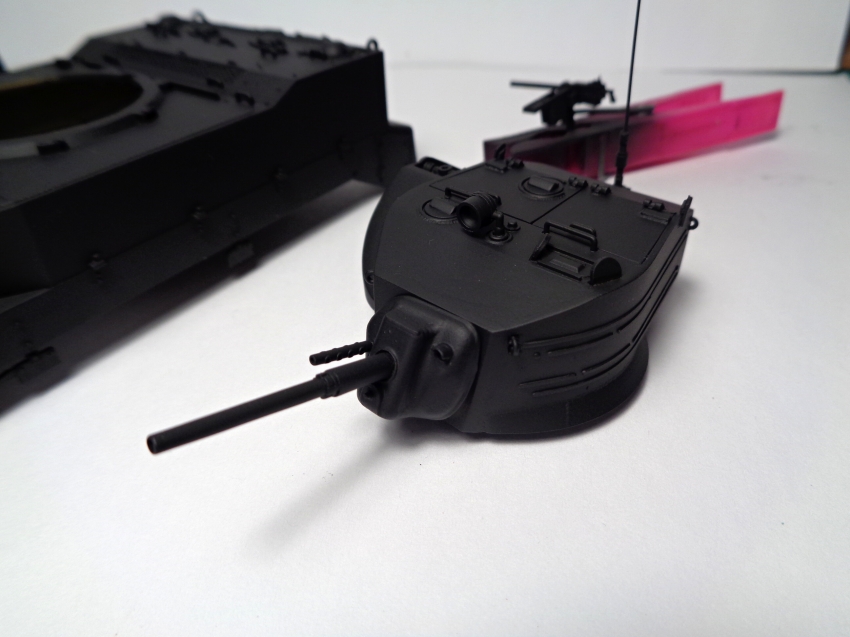
Jakubsdk : |
18/1/2020 11:19 |
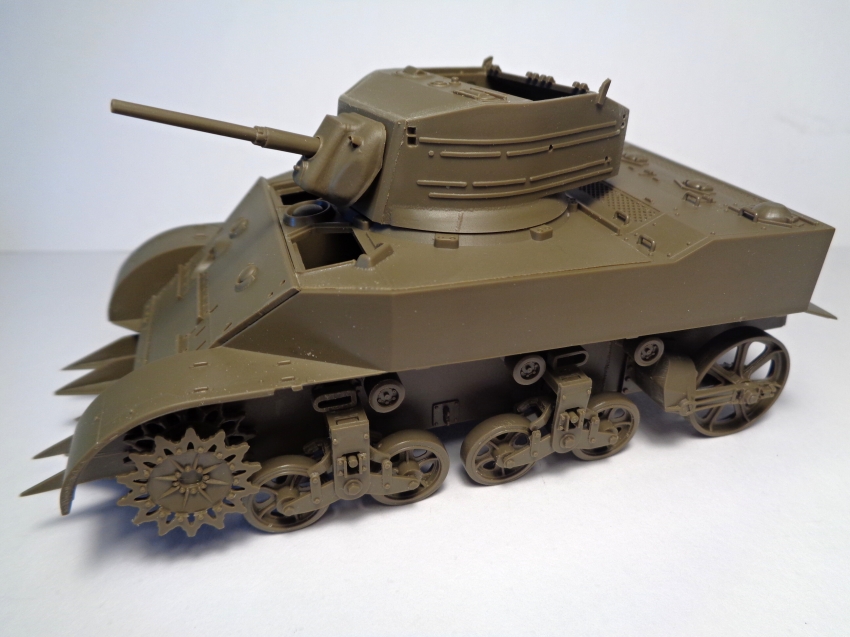
Hi,
details added and I'm ready to paint. 
Ciao,
dettagli aggiunti e sono pronto per dipingere.
| |
|
Jakubsdk : |
19/1/2020 15:17 |
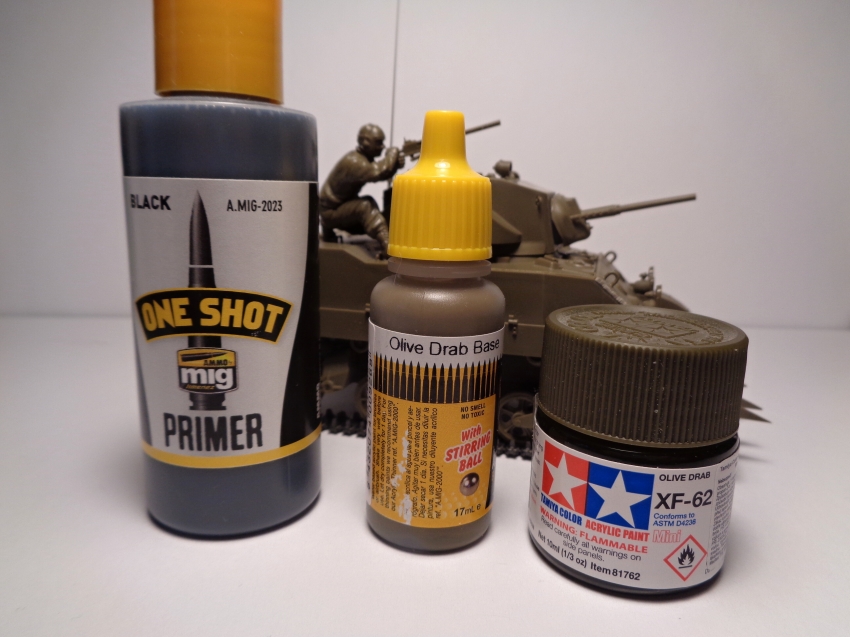
Good Sunday everyone,
Last night I applied the primer, I tried this AMMO self-leveling primer for the first time and I am very satisfied with the result. Today I have to apply Olive drab Base.
Next steps soon.
Buona domenica a tutti
Ieri sera ho applicato il primer, ho provato questo primer autolivellante AMMO per la prima volta e sono molto soddisfatto del risultato. Oggi devo applicare Olive drab Base.
I prossimi passi presto.
| |
|
enrico63 : |
19/1/2020 16:54 |
Montaggio pulito e preciso. Cavoli sei velocissimo!!!
| |
|
GP1964FG : |
19/1/2020 17:41 |
Very nice the assembly job and the primer looks very subtle. I like this small tank and you are making a little jewel.
👌
Gianfranco | |
|
Jakubsdk : |
21/1/2020 10:54 |
Hello friends modelers,
Thank you very much for your comments.
Today I'm bringing another advance on the tank. In the second phase of dyeing I applied Olive drab base, on the surface I made an ugly structure  (little thinner and retardant). For the third stage I prepared an olive drab and mixed everything to the right consistency. The result perfectly masked the previous failure. (little thinner and retardant). For the third stage I prepared an olive drab and mixed everything to the right consistency. The result perfectly masked the previous failure. 
Ciao amici modellisti,
Grazie mille per i tuoi commenti.
Oggi sto portando un altro progresso sul serbatoio. Nella seconda fase della tintura ho applicato la base grigia di oliva, sulla superficie ho creato una brutta struttura (poco più sottile e ritardante). Per la terza fase ho preparato un drappo di olive e ho mescolato tutto alla giusta consistenza. Il risultato ha mascherato perfettamente il precedente fallimento.

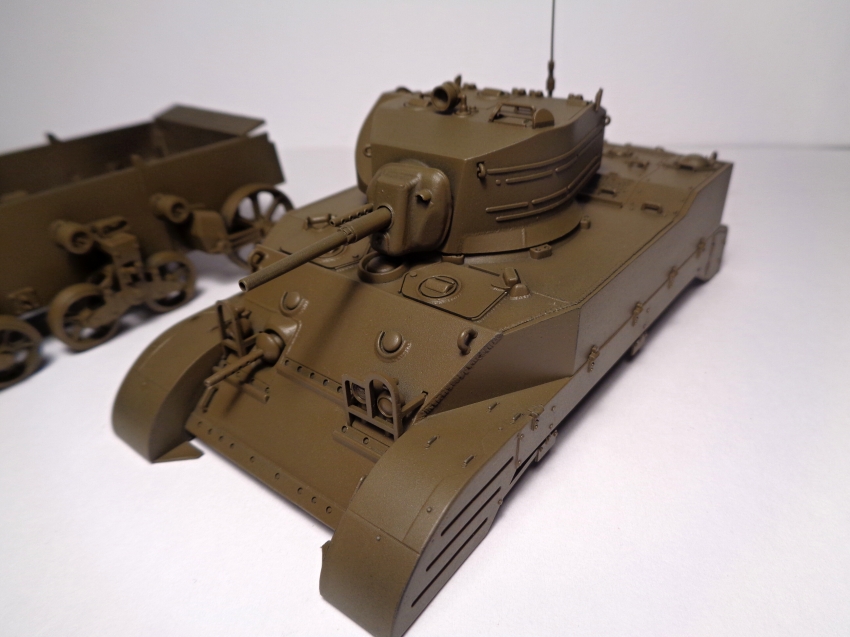

Final olive drab:


| |
|
Jakubsdk : |
24/1/2020 13:41 |
Good day friends,
I continue building. So far I have finished glossy varnish, decals, matt varnish, filter and wash. I continue to paint tools and other details.
Ciao amici
Continuo a costruire. Finora ho rifinito vernice lucida, decalcomanie, vernice opaca, filtro e lavaggio. Continuo a dipingere strumenti e altri dettagli.


| |
|
Tomcat71 : |
24/1/2020 13:51 |
Very nice indeed!
Painting of wooden parts is noteworthy.
Paolo Fanin | |
|
Antonio 13 : |
24/1/2020 19:20 |
|
WOW !! Good job! I really like the color finishes. | |
|
Jakubsdk : |
25/1/2020 11:00 |
Thank you for your kind comments.
So far I am learning everything and there is still room for improvement. 
Grazie per i vostri gentili commenti.
Finora sto imparando tutto e c'è ancora spazio per migliorare.
| |
|
Jakubsdk : |
26/1/2020 13:15 |
Hi friends,
work continues and the end is slowly approaching. 
Ciao amici
il lavoro continua e la fine si sta lentamente avvicinando.


| |
|
Jakubsdk : |
26/1/2020 15:48 |
Surface correction performed. 
Correzione della superficie eseguita.

| |
|
enrico63 : |
26/1/2020 17:05 |
Starai anche imparando come dici tu....però il risultato è fantastico!!
| |
|
Antonio 13 : |
26/1/2020 18:36 |
Congratulations, it is very nice with dust and mud! Are You going to create a scene?
Complimenti, è molto bello con polvere e fango!
Hai intenzione di creare una scena? | |
|
Jakubsdk : |
26/1/2020 23:53 |
Thank you friends, I appreciate it.
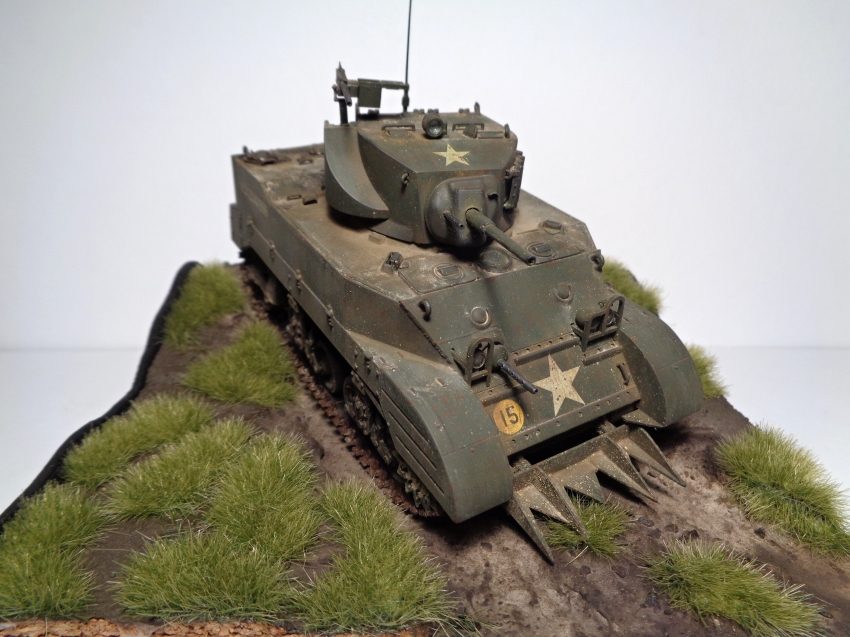
And yes, I plan to make a simple pad for the tank.
Thank you again and good night. 
Grazie amici, lo apprezzo molto.
E sì, ho intenzione di creare un semplice pad per il carro armato.
Grazie ancora e buona notte.
| |
|
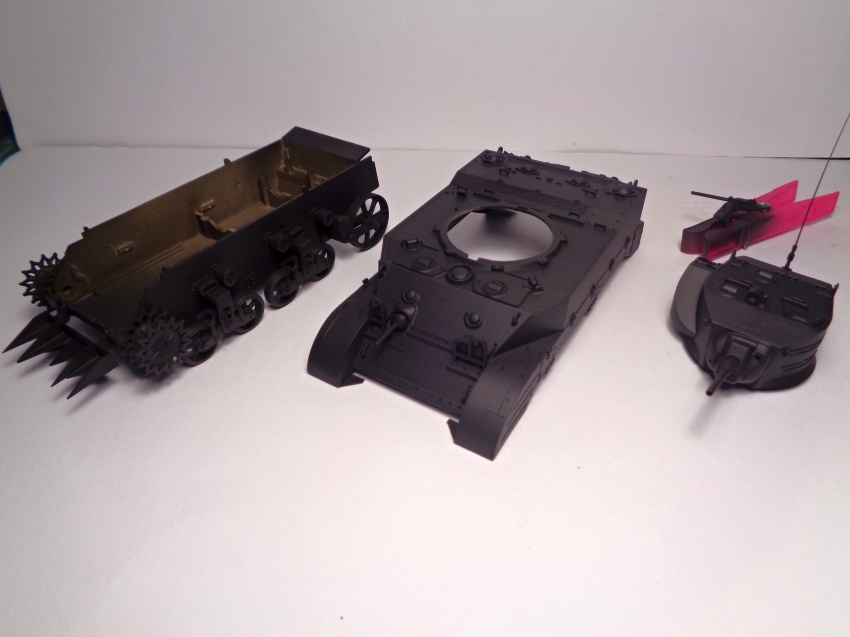
Jakubsdk : |
28/1/2020 00:05 |
Hi,
today I finished the tracks and assembled the tank. Now just finish the pigment. Work began on the mat and so far it looks like this.
Ciao,
oggi ho finito i cinture e assemblato il carro armato. Ora finisci il pigmento. I lavori sono iniziati sul pad e finora sembra così.
| |
|
jEnrique61 : |
28/1/2020 23:33 |
Hi, First of all I congratulate you for the painting technique, truly realistic. But don't be offended, the tracks of the M5 Tamiya are wrong, because the metal guide straddles the rubber blocks ...
Ciao, Prima di tutto ti faccio i complimenti per la tecnica pittorica, veramente realista. Ma non offenderti, i cingoli del M5 Tamiya sono sbagliati, perché la guida di metallo è a cavallo dei tasselli in gomma...
They are fun to assemble and are very beautiful. Regards
Sono divertenti da montare e sono molto belle. Saluti
| |
|
Jakubsdk : |
29/1/2020 20:41 |
Quote: jEnrique61 wrote: Hi, First of all I congratulate you for the painting technique, truly realistic. But don't be offended, the tracks of the M5 Tamiya are wrong, because the metal guide straddles the rubber blocks ... Ciao, Prima di tutto ti faccio i complimenti per la tecnica pittorica, veramente realista. Ma non offenderti, i cingoli del M5 Tamiya sono sbagliati, perché la guida di metallo è a cavallo dei tasselli in gomma... They are fun to assemble and are very beautiful. Regards Sono divertenti da montare e sono molto belle. Saluti
Hi,
Thank you. And I think the tracks are fine. I found the photos before dyeing, and the tracks I painted old rust and rubber black.
Ciao,
Grazie. E penso che le cingoli stiano bene. Ho trovato le foto prima di tingere e le cingoli che ho dipinto di ruggine vecchia e gomma nera.
----------------------------------------------------------------------------------------------------------------------------------------------
For today I have new photos finished pads, few more details and it will be done.
Per oggi ho nuovi pad finiti con foto, qualche dettaglio in più e sarà fatto.

| |
|
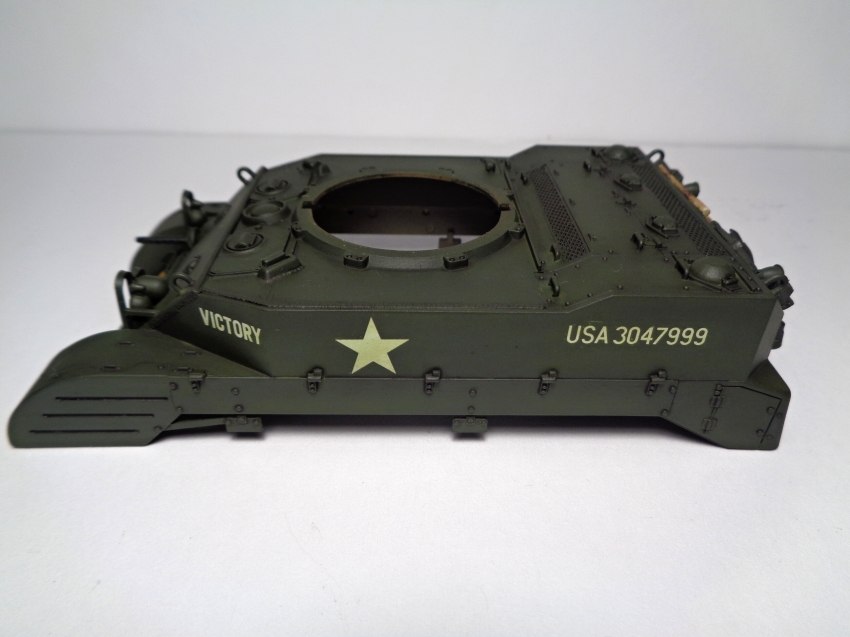
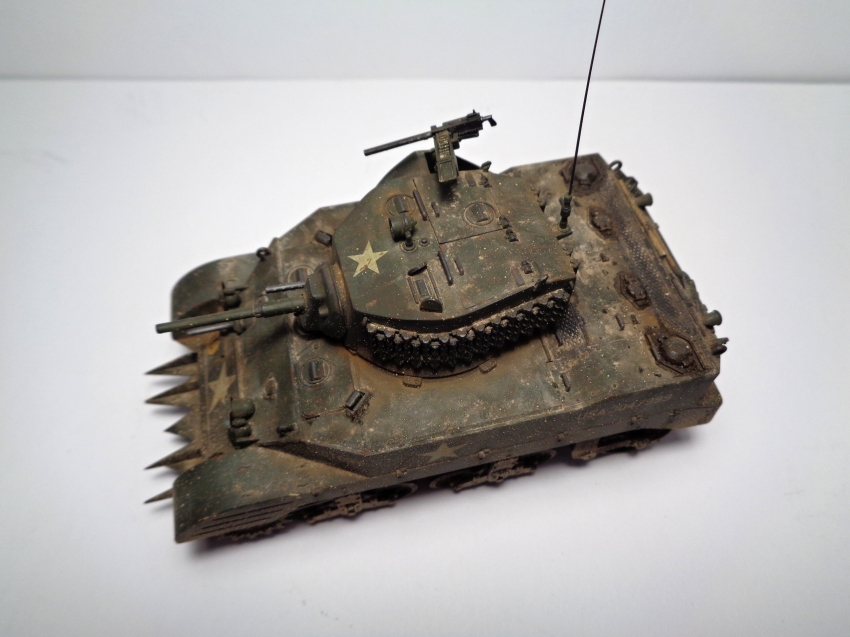
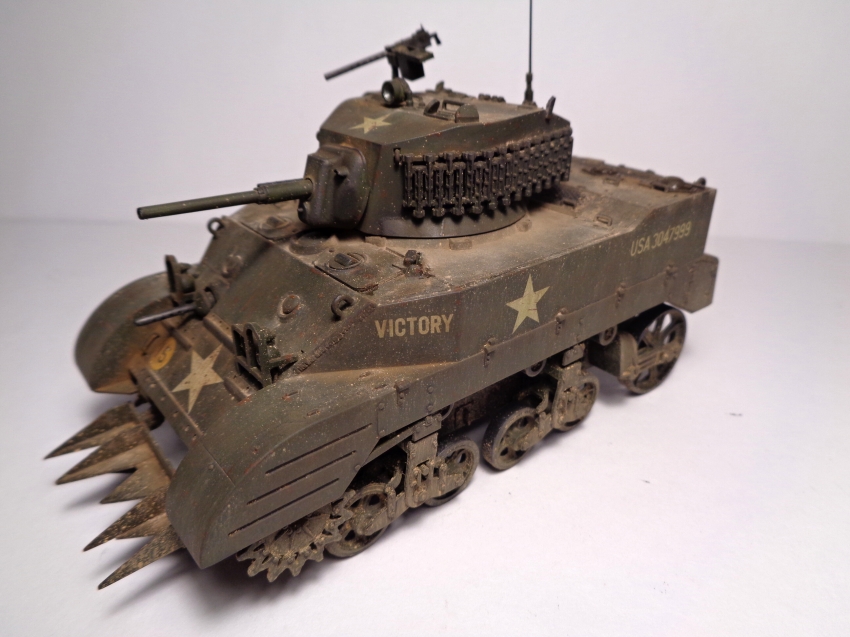
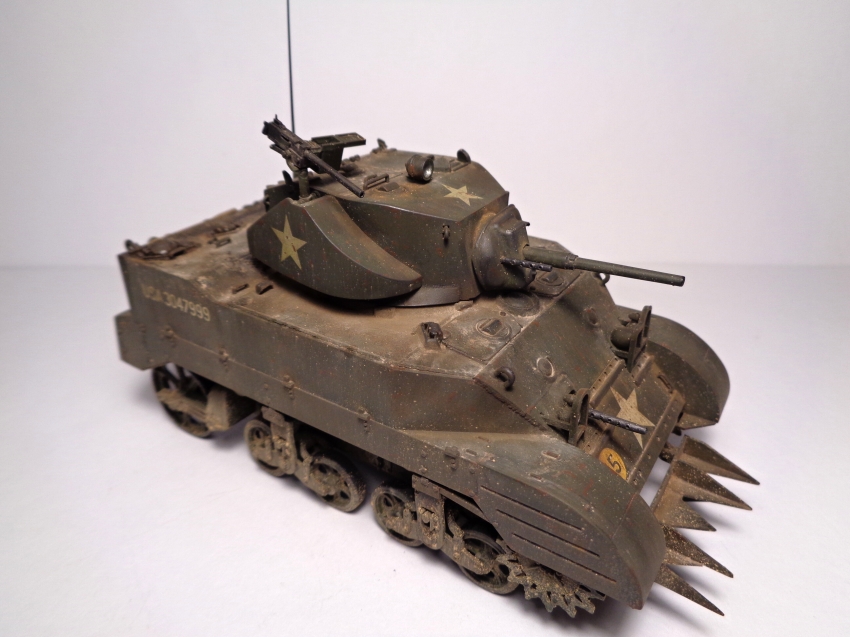
Jakubsdk : |
31/1/2020 14:57 |
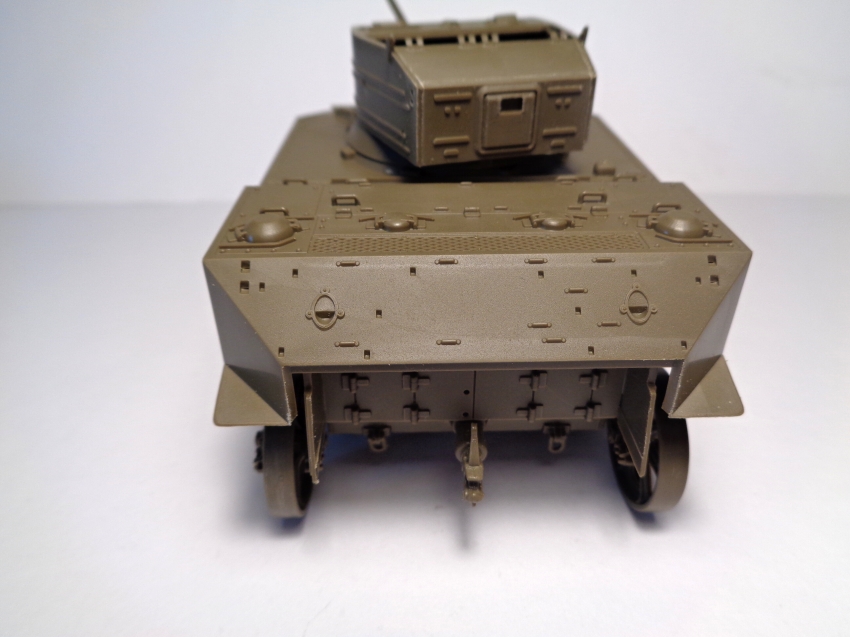
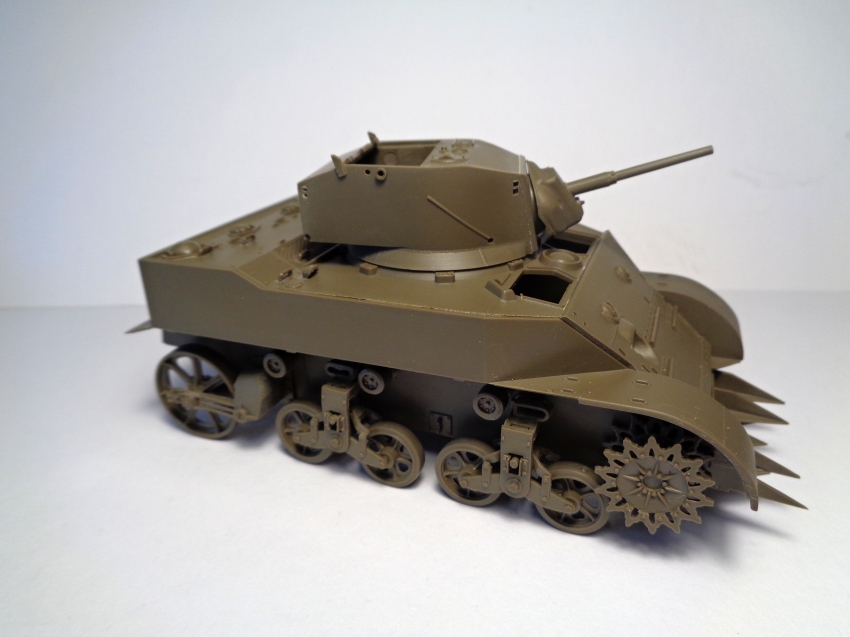
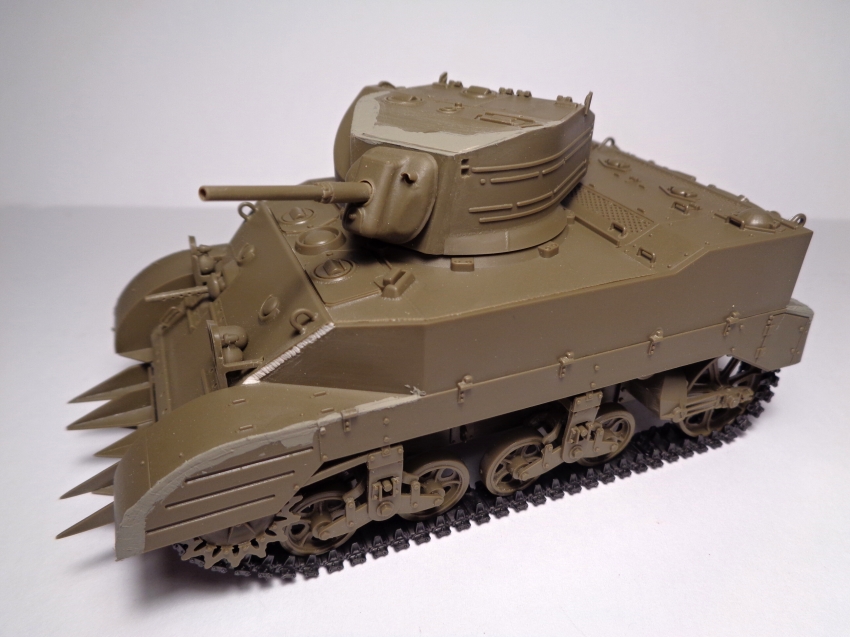
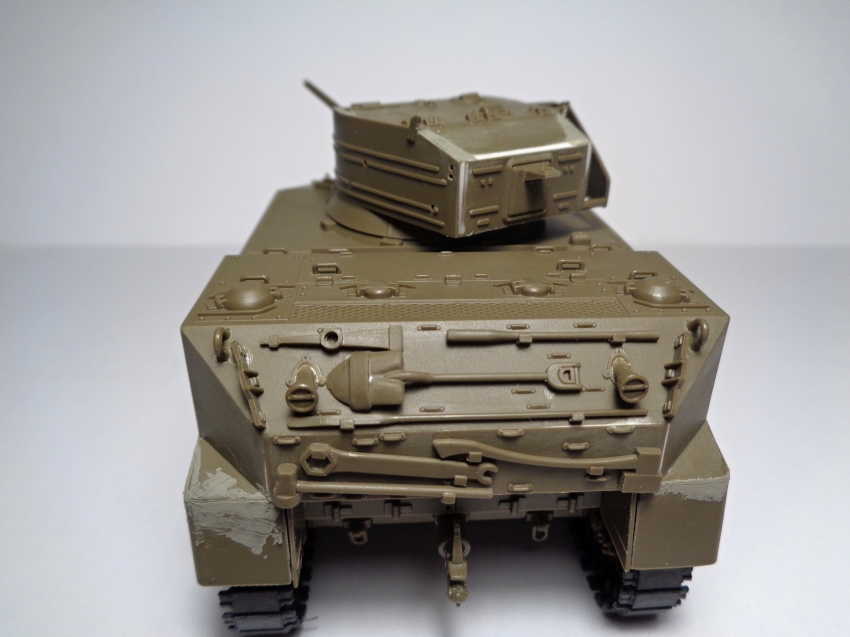
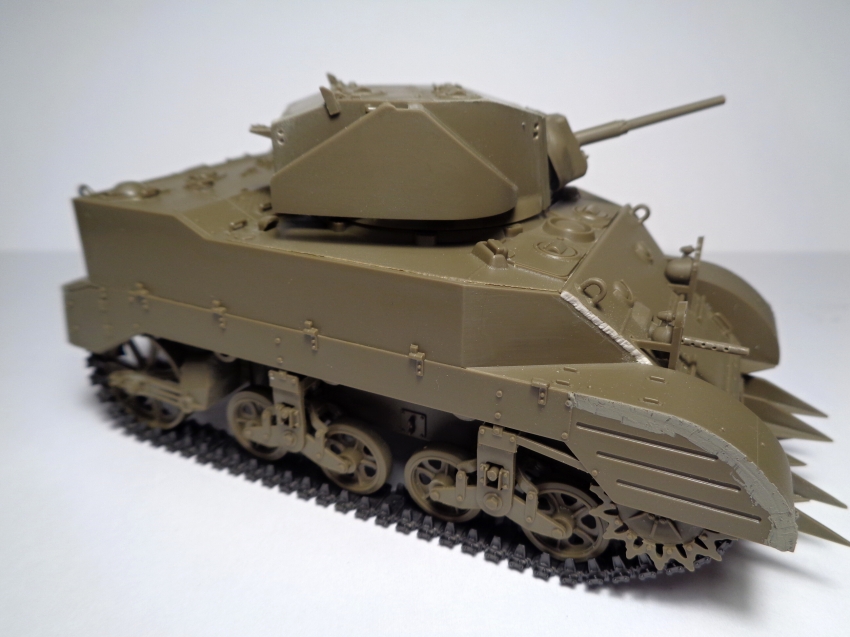
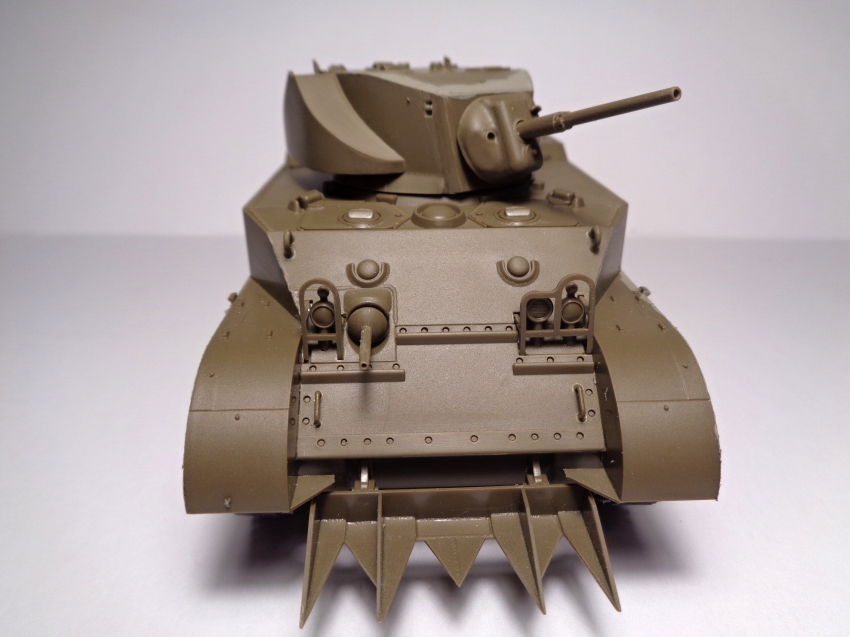
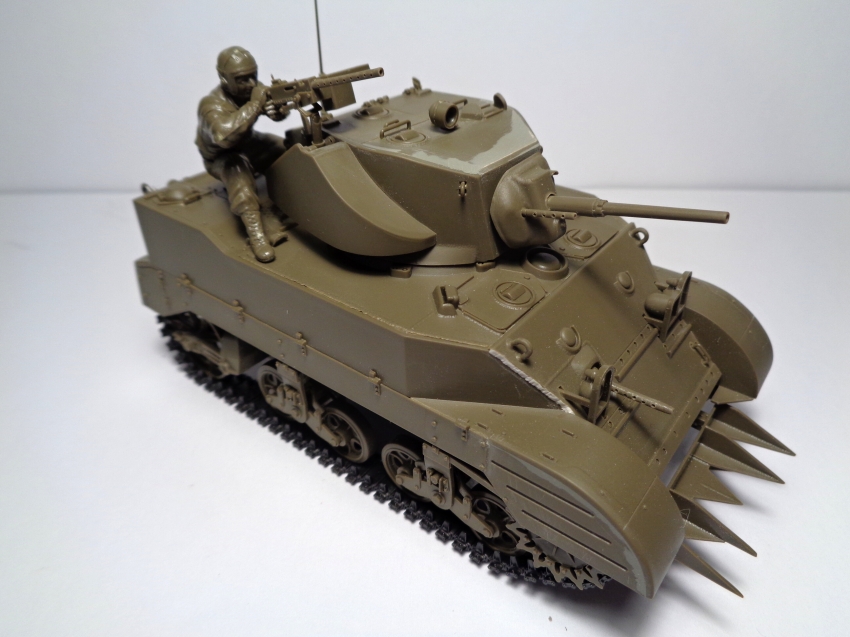
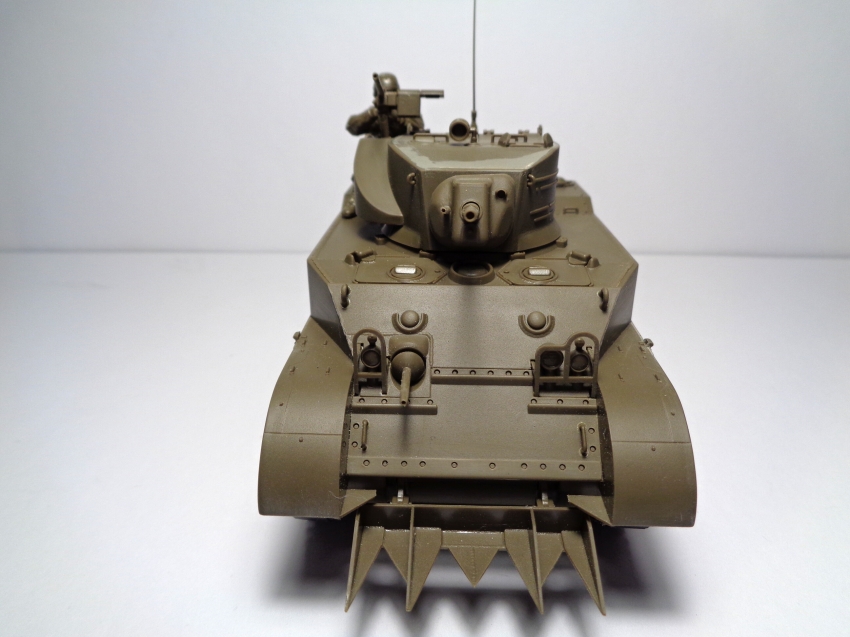
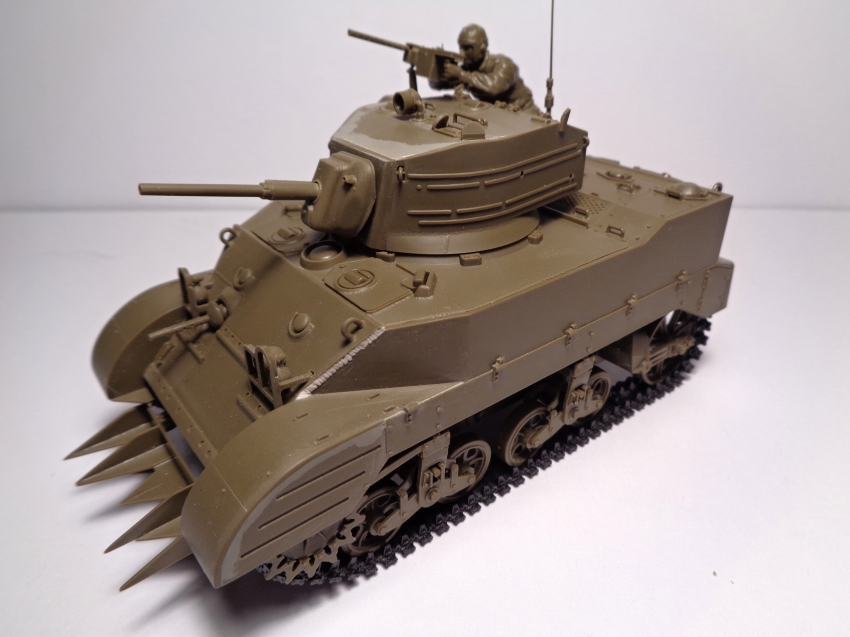
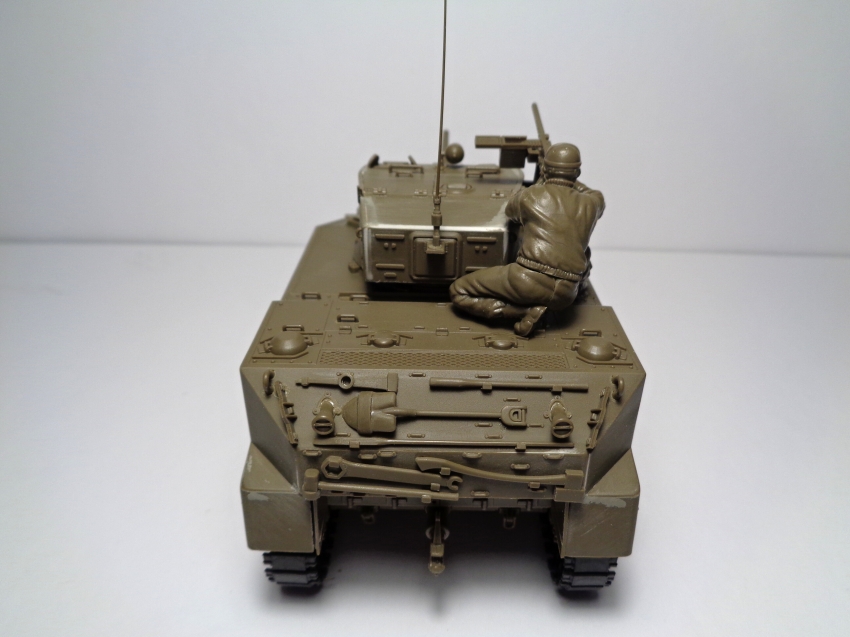
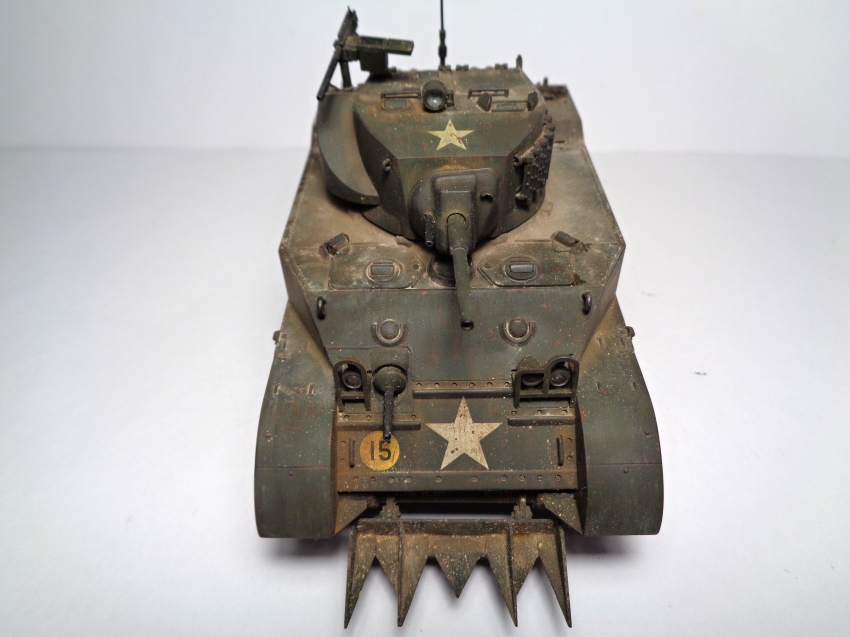
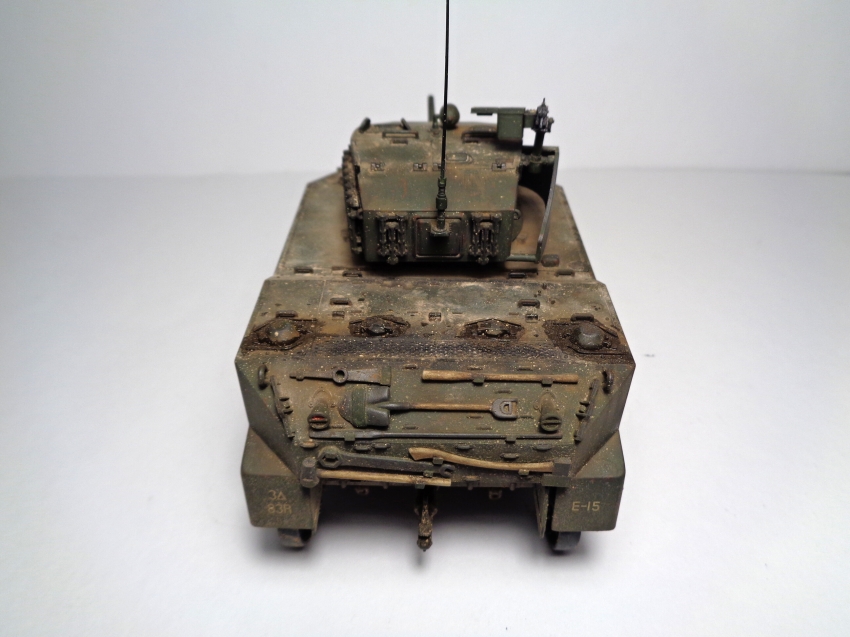
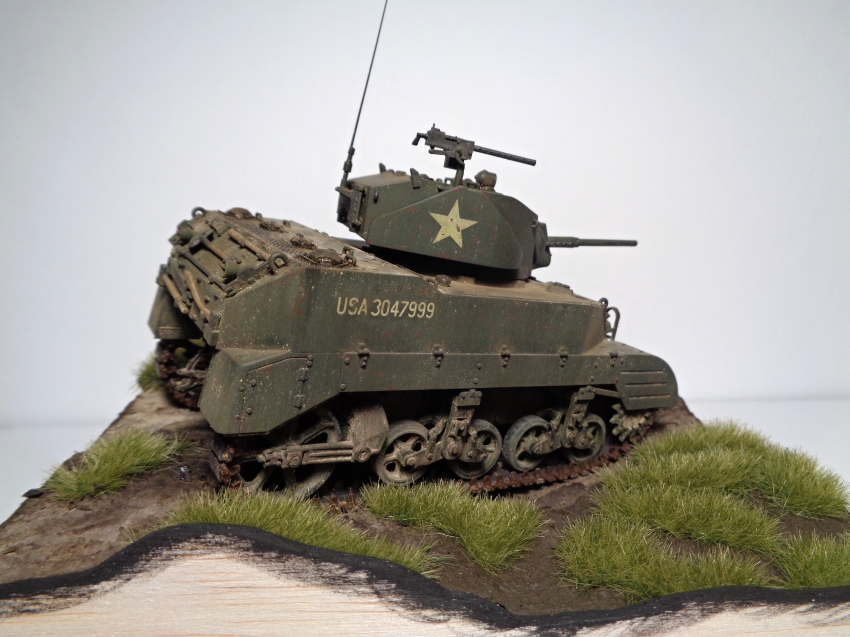
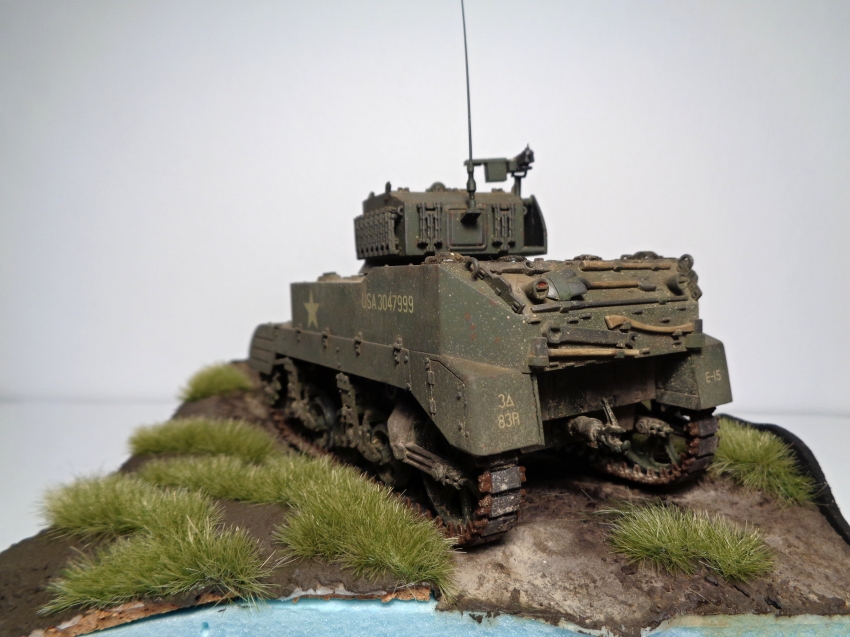
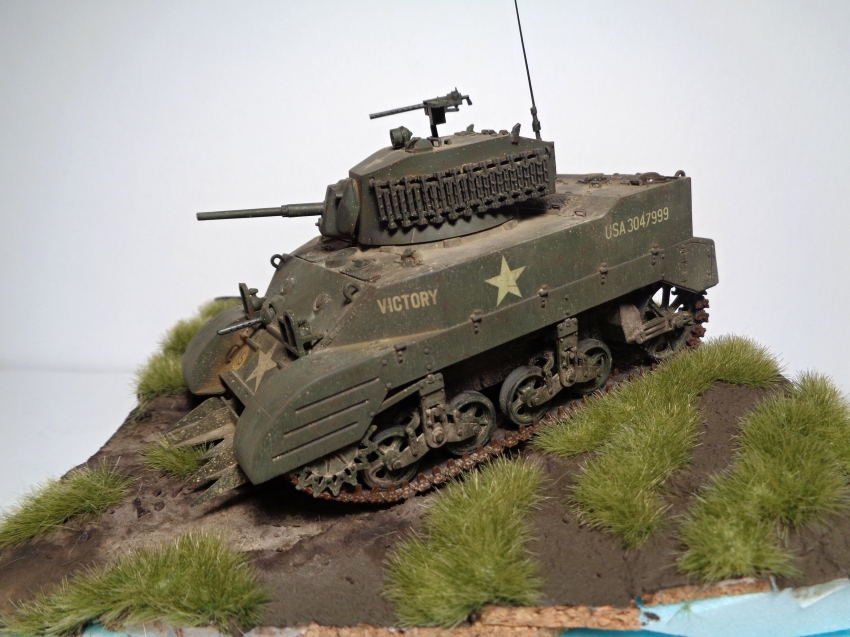
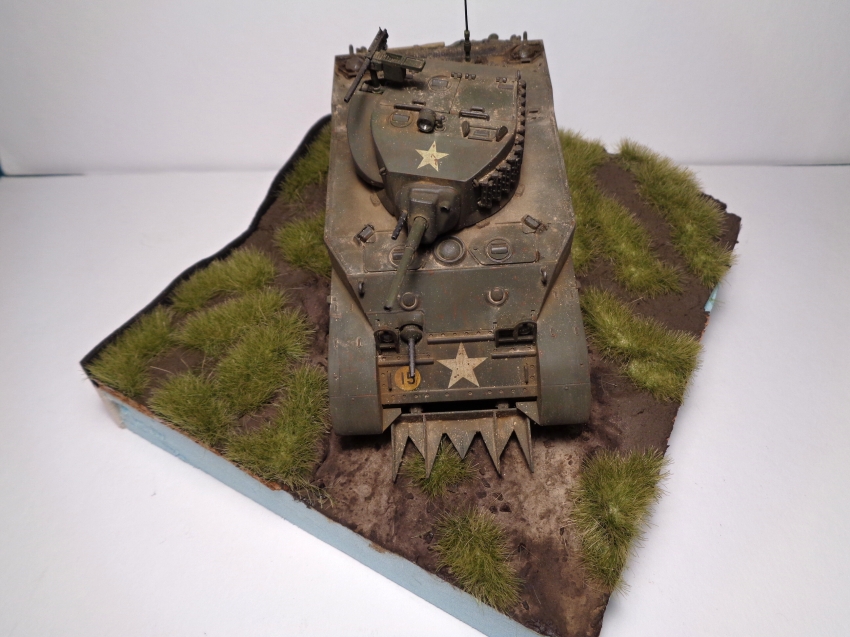
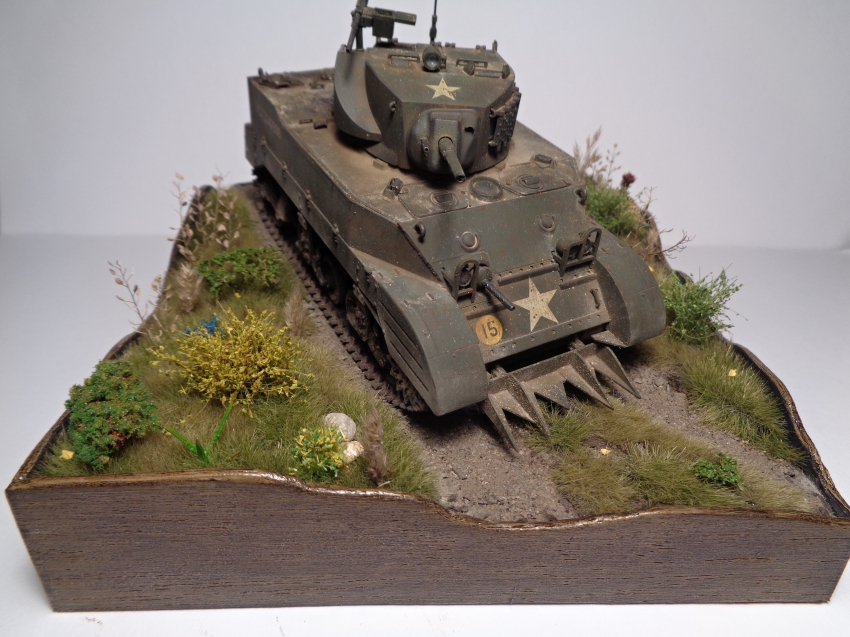
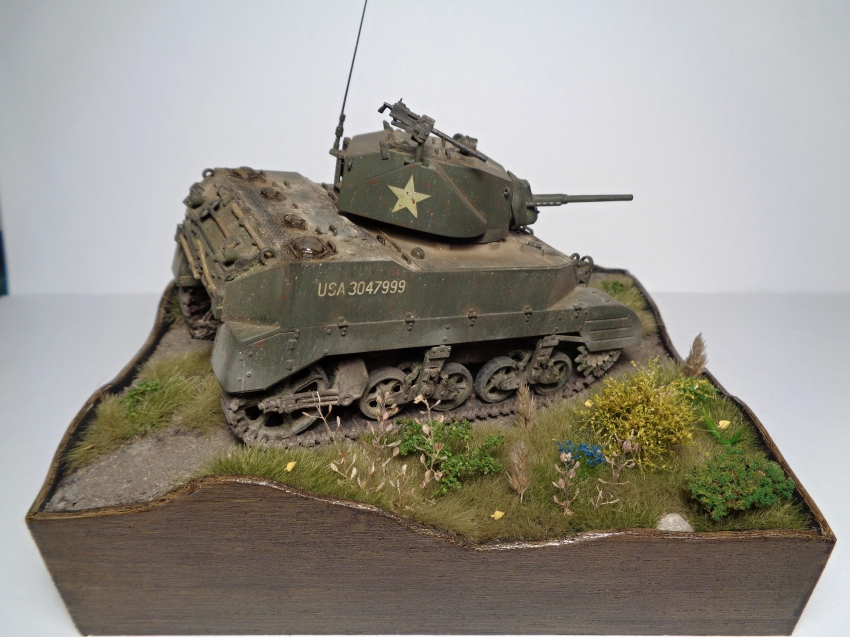
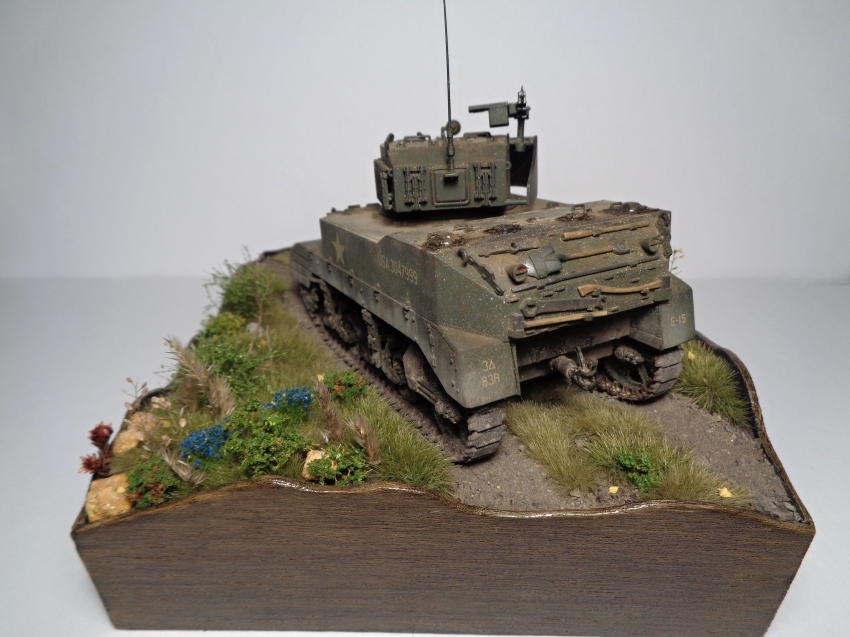
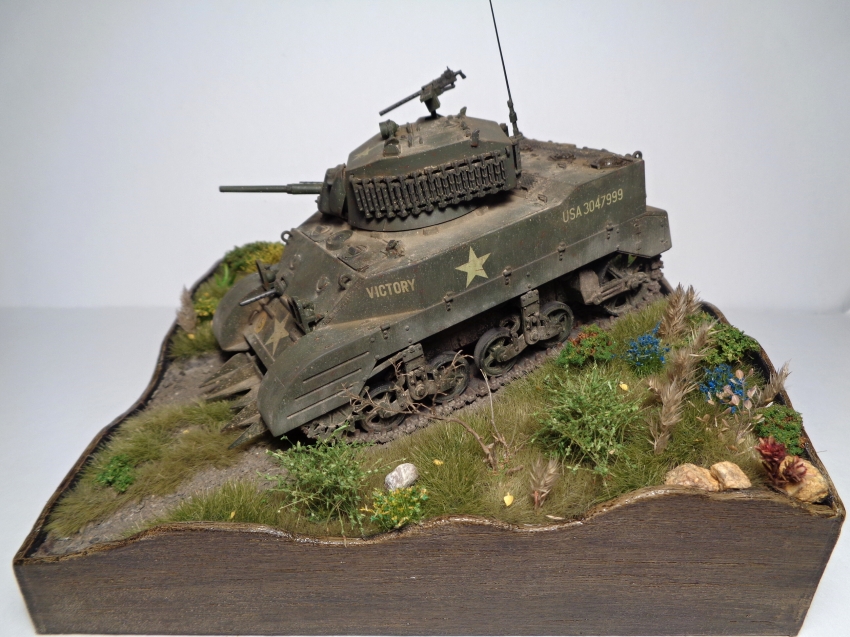
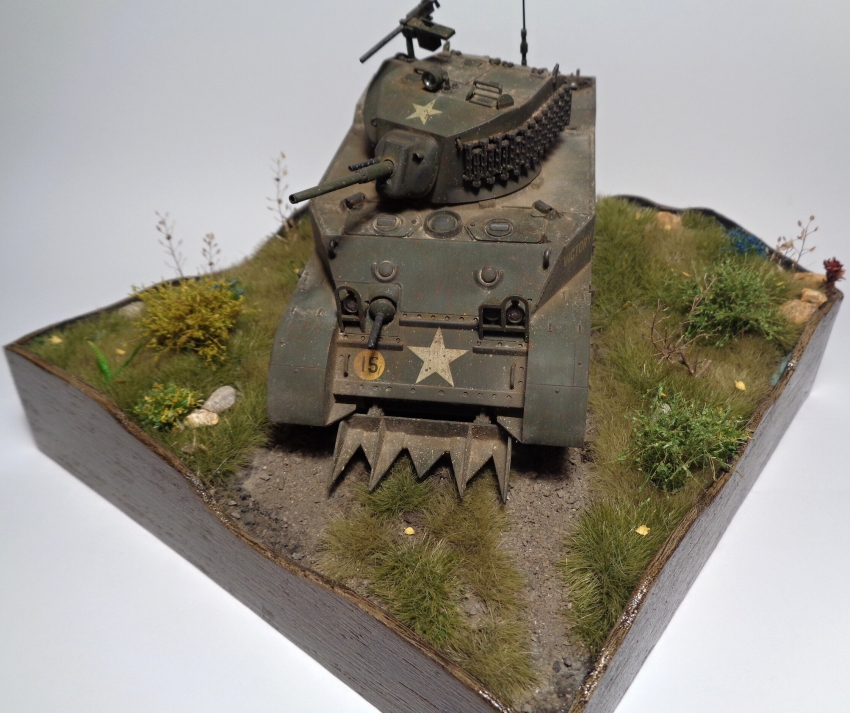
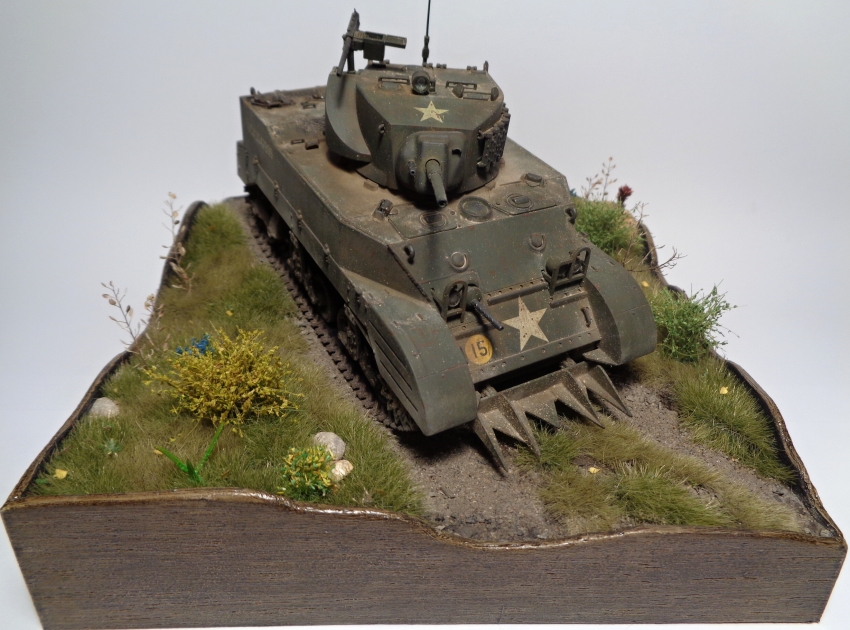
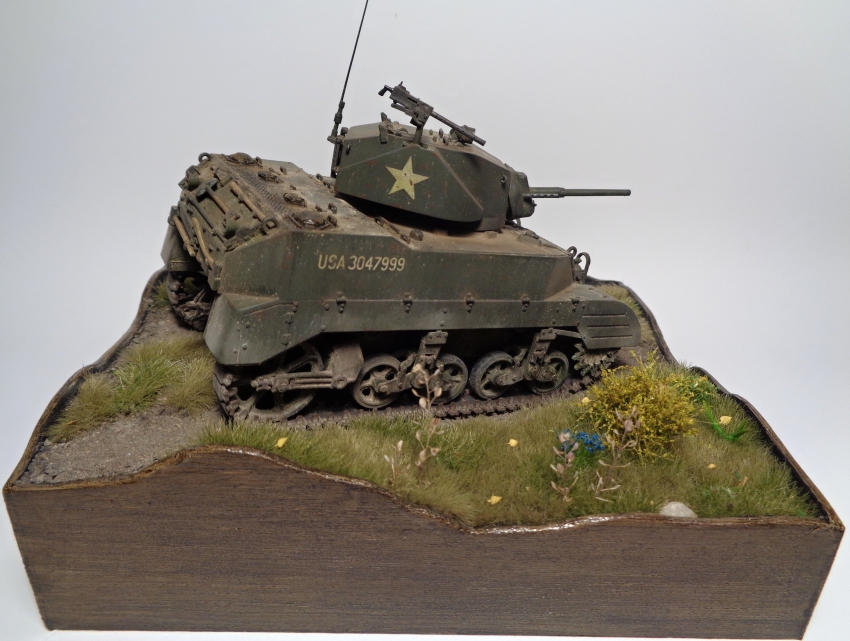
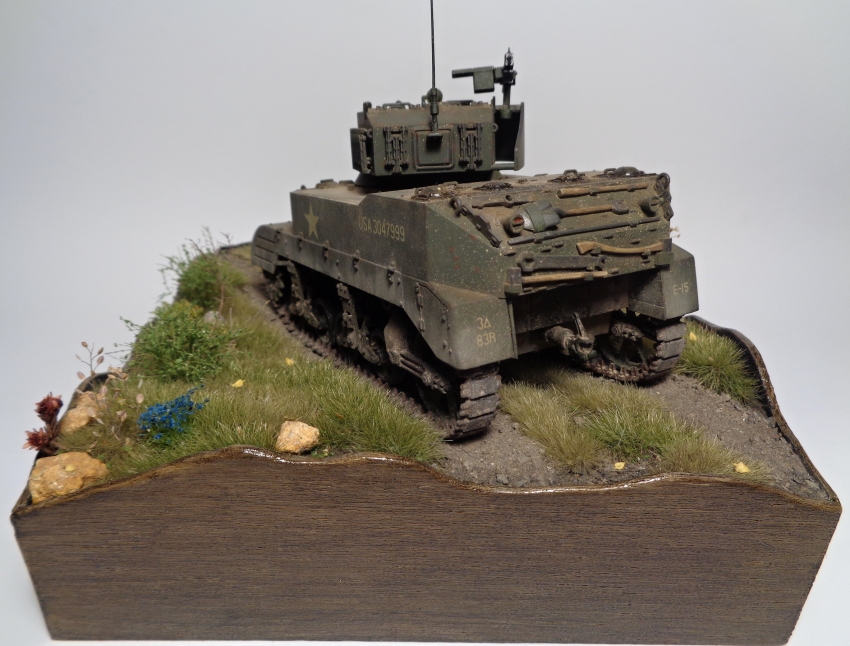
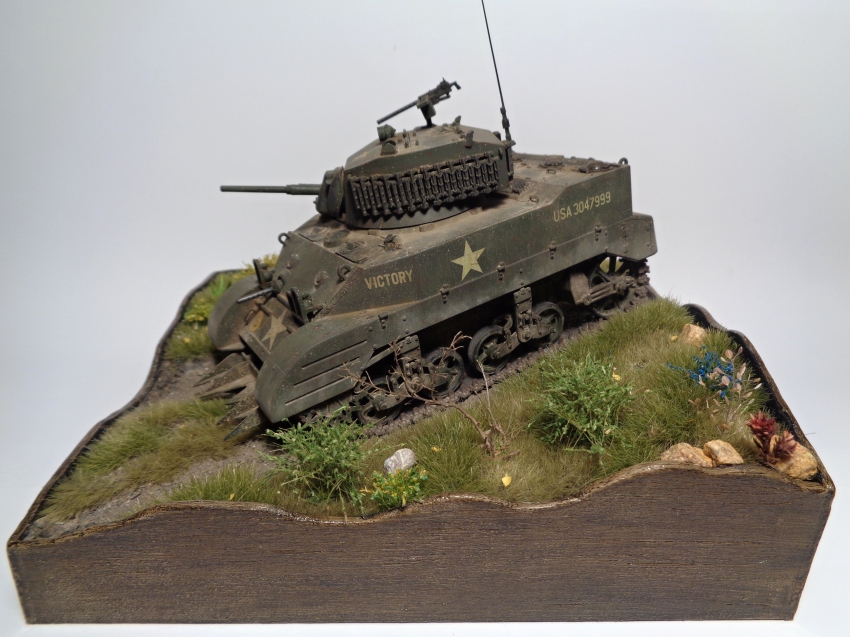
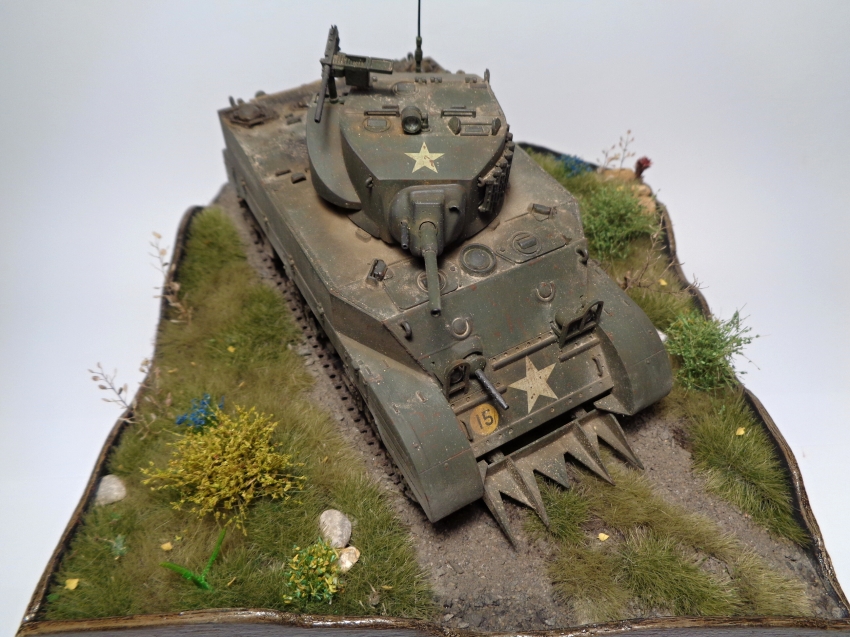
Hello modelers,
today I finished Stuart. I cut the landscape a bit, there were too many weeds. Now I'm happy. The kit is great and everything fits as it should. Here are the final photos.
Ciao modellisti,
oggi ho finito Stuart. Ho tagliato un po 'il paesaggio, c'erano troppe erbacce. Ora sono felice. Il kit è eccezionale e tutto si adatta come dovrebbe. Ecco le foto finali.
| |
|
Frizzi : |
31/1/2020 15:46 |
Dobryden!
Bellissimo lavoro sul carro e ottima la basetta, semplice ma di effetto.
Mirko | |
|
Jakubsdk : |
1/2/2020 14:18 |
Dobrý den Mirko
Ciao Mirko,
grazie mille
| |
|
stephaneT : |
1/2/2020 14:40 |
Very nice job!! I love it  | |
|
© 2004-2018 www.modellismopiu.it
https://www.modellismopiu.it
URL di questa discussione
https://www.modellismopiu.it/modules/newbb_plus/viewtopic.php?topic_id=140776&forum=4
|